1
 →
→
Omnigent is an open-source AI agent framework and meta-harness: orchestrate Claude Code, Codex, Cursor, Pi, and custom agents — swap harnesses without rewriting, enforce policies and sandboxing
omnigent-ai/omnigent is an open-source project on GitHub, mainly written in Python. Omnigent is an open-source AI agent framework and meta-harness: orchestrate Claude Code, Codex, Cursor, Pi It currently holds 10,622 stars and 1,698 forks with 0 open issues, and was last pushed on an unknown date (repository created unknown).
AI Homed tracks it on the Today's Trending board, currently at rank #37 with 50 new stars today.
 Omnigent
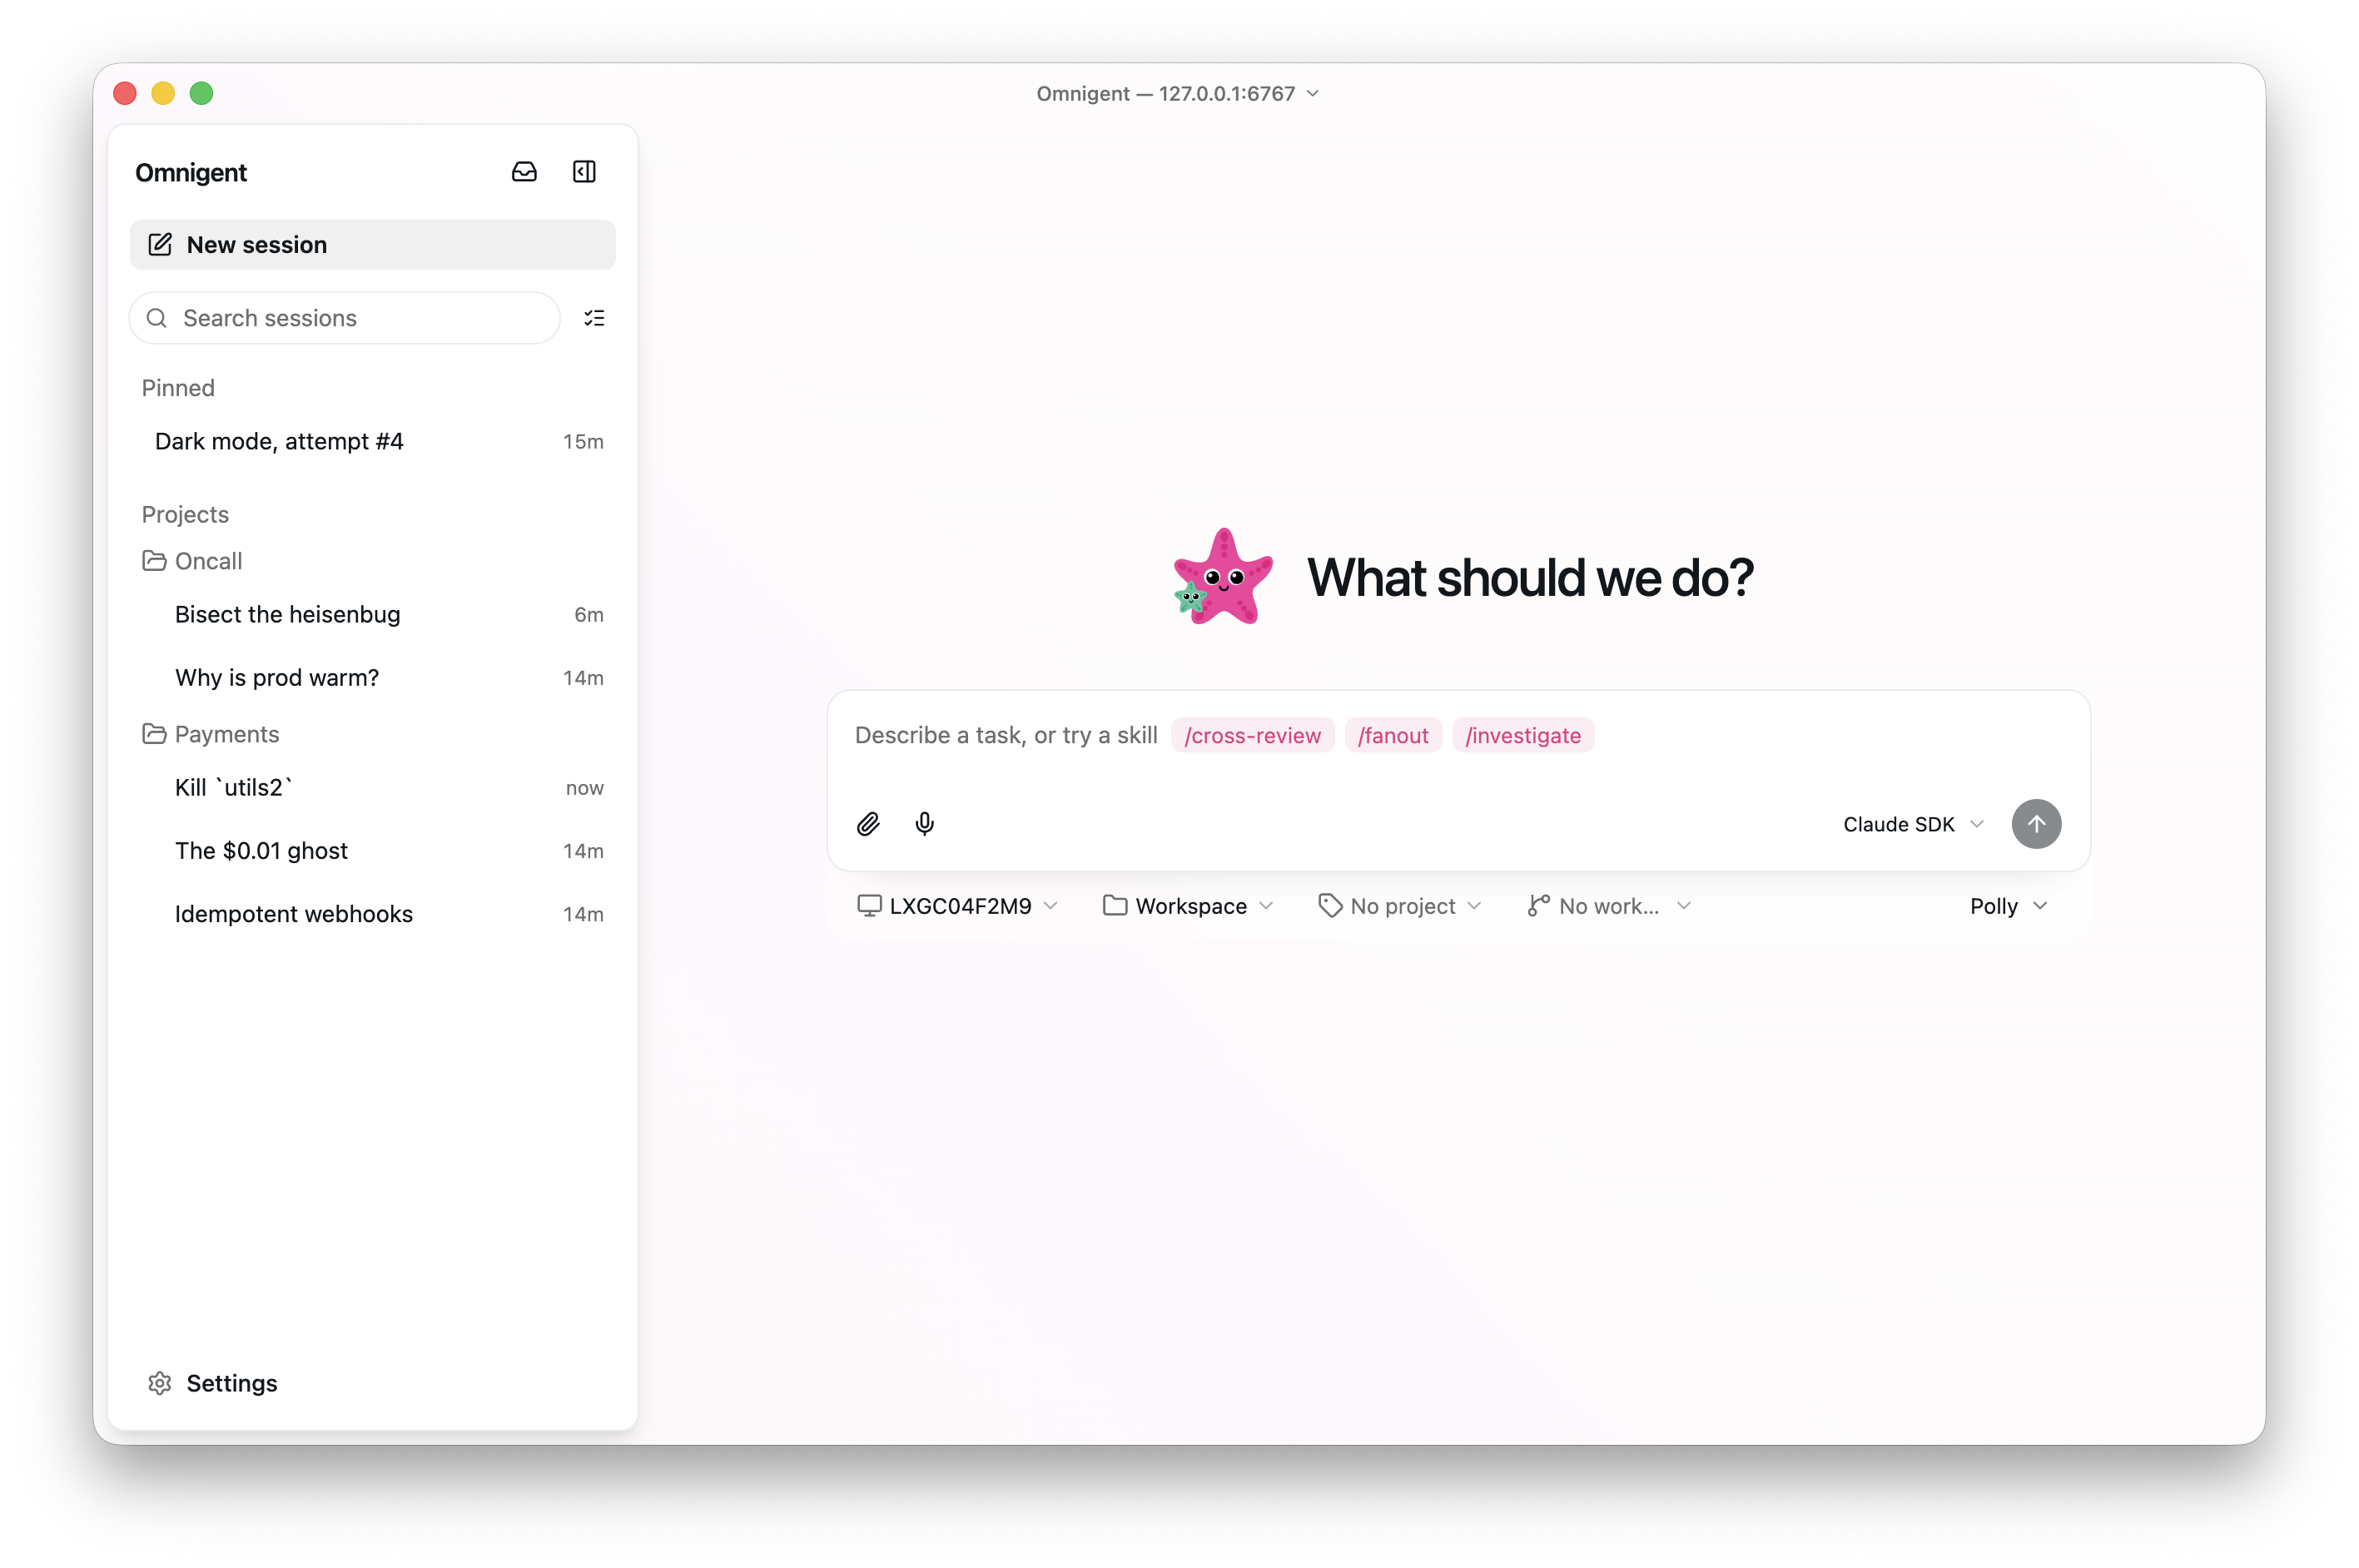
Omnigent is an open-source meta-harness that gives you a common orchestration layer over Claude Code, Codex, Cursor, OpenCode, Hermes, Pi, and the agents you write yourself: swap or combine harnesses without rewriting, enforce policies and sandboxing, and collaborate in real time from any device — terminal, browser, phone, or the native desktop app.



---
Omnigent lets you:
---
One command installs Omnigent and everything it needs:
curl -fsSL https://raw.githubusercontent.com/omnigent-ai/omnigent/main/scripts/install_oss.sh | sh
Need an optional integration? Pass one or more extras to the installer:
curl -fsSL https://raw.githubusercontent.com/omnigent-ai/omnigent/main/scripts/install_oss.sh | sh -s -- --extra databricks
curl -fsSL https://raw.githubusercontent.com/omnigent-ai/omnigent/main/scripts/install_oss.sh | sh -s -- --extra modal,e2b
Available user-facing extras include:
databricks, bedrock, vertexmodal, daytona, blaxel, boxlite, microsandbox,cwsandbox, e2b, openshell, kubernetes
antigravity, copilot, cursor, agents-sdks3, hindsightOmnigent needs Python 3.12+. Install the omnigent package:
uv tool install omnigent # or: pip install "omnigent"
Manual installs use the same extras syntax, for example:
uv tool install "omnigent[databricks,modal]"
Or with Homebrew:
brew install omnigent-ai/tap/omnigent
For source builds on networks that require package mirrors, replace these example URLs with your mirrors:
HOMEBREW_PIP_INDEX_URL='https://pypi.example.com/simple' \
HOMEBREW_CARGO_INDEX_URL='https://cargo.example.com/index/' \
  brew install --build-from-source omnigent-ai/tap/omnigent
The PyPI setting also routes pip's isolated build dependencies through the mirror.
The Cargo setting takes a sparse registry index URL ending in /, without the
sparse+ prefix. Both overrides are optional and do not affect prebuilt-bottle
installs.
Or install straight from the repo:
uv tool install -q --python 3.12 git+https://github.com/omnigent-ai/omnigent.git
uv (required). https://docs.astral.sh/uv/getting-started/installation/git (required).npm (for the coding-harness CLIsomnigent run) and pnpm (for the web UI). You can get
both from a single Node install; pnpm is available via
corepack enable or npm install -g pnpm.
omnigent devin: install withcurl -fsSL https://cli.devin.ai/install.sh | bash, then sign in with
devin auth login. Devin tool approvals appear as Chat approval cards
(its PermissionRequest hook is mirrored to the web UI) and stay
answerable in the embedded Terminal. See docs/devin-native.md.
omnigent kiro: install withcurl -fsSL https://cli.kiro.dev/install | bash, then sign in with Kiro.
Kiro tool approvals stay answerable in the embedded Terminal; supported
one-time approvals also appear as Chat cards. See
docs/kiro-native-elicitation.md.
tmux, required by the native omnigent terminal wrappersclaude, codex, cursor, devin, hermes, kiro, pi)
(brew install tmux / apt install tmux; the installer offers
to install it for you).
bubblewrap (bwrap), Linux only. The native omnigent pi harness wrap each agent
terminal in a bwrap OS-sandbox; on Linux that isolation is mandatory, so a
missing bwrap binary makes those terminals fail to start
(apt install bubblewrap; the installer offers to install it for you). macOS
uses the built-in seatbelt sandbox and needs nothing extra.
databricks extra:
uv tool install "omnigent[databricks]" — or pass it to the bootstrap
installer with ... | sh -s -- --extra databricks. Signing in to the
workspace also uses the Databricks CLI.
Omnigent runs natively on Windows in a degraded mode. The install_oss.sh
bootstrap is POSIX-only, so install with uv directly:
uv tool install --python 3.12 omnigent
or from the repo:
uv tool install --python 3.12 git+https://github.com/omnigent-ai/omnigent.git
What works on Windows: omnigent server, the web UI, and the SDK-based
harnesses (omnigent run with the claude-sdk / cursor / codex
harnesses). Agents run under a Windows Job Object for process-tree
containment.
What is not available on Windows (use Linux/macOS, or WSL, for these):
omnigent claude / omnigent codex / omnigent cursorbwrap/seatbelt filesystem & network sandboxing and the L7 egress proxyWhen a newer release is on PyPI, Omnigent shows a one-line notice (once per release) pointing here. To update:
omni upgrade            # detects how you installed, drains & stops the local
                        # server, then runs the matching upgrade command
omni upgrade --check    # just report whether a newer release is available
omni upgrade waits for in-flight agent sessions to finish before stopping the
local server (pass --force to stop them immediately); the next omni command
brings the server back up on the new version. Source checkouts update with
git pull instead. Silence the notice with OMNIGENT_NO_UPDATE_CHECK=1.
The check queries your configured package index — honoring UV_INDEX_URL /
PIP_INDEX_URL and your uv.toml / pip.conf (default PyPI), so private
mirrors work out of the box; override with OMNIGENT_INDEX_URL if needed.
Preview the CLI/profile cleanup that would run by default:
omnigent uninstall
Remove the CLI and installer-managed PATH entries while keeping your local history, credentials, and projects:
omnigent uninstall --yes
To also remove Omnigent state under ~/.omnigent, pass --purge; Omnigent
backs it up outside the target before deletion. Your ~/omnigent workspace is
kept unless you explicitly add --purge-workspace.
omnigent uninstall --purge --yes
If the installed wheel is broken or omnigent is not on PATH, run the
standalone script instead:
curl -fsSL https://raw.githubusercontent.com/omnigent-ai/omnigent/main/scripts/uninstall_oss.sh | sh
Add --yes to the standalone script to perform the previewed CLI cleanup.
omnigent picks a model with you and starts a session in your terminal. It
also launches a local web UI at http://localhost:6767 that shows the same
session in the browser, or on a phone on your network (step 4). The
desktop app wraps that same UI
in a native window and adds OS notifications (with a configurable sound) and a dock badge —
download it for macOS.
[!NOTE]
The install puts two names for the same CLI on your PATH: omnigent and
the shorter omni. They're interchangeable.
[!TIP]
On first run, Omnigent picks up model credentials already in your
environment (anANTHROPIC_API_KEY/OPENAI_API_KEY, or aclaude/
codex CLI you're logged into) and offers one as the default.omnigent
Or launch a specific agent runtime:
omnigent claude                      # Claude Code, in a session your team can join
omnigent codex                       # Codex
omnigent cursor                      # Cursor
omnigent agy                         # Antigravity
omnigent opencode                    # OpenCode
omnigent hermes                      # Hermes Agent (Nous Research)
omnigent pi                          # Pi
omnigent copilot                     # GitHub Copilot (SDK harness, via omnigent run)
omnigent agy requires agy 1.1.13 or newer. When GEMINI_API_KEY is set,
direct Gemini API authentication takes precedence over agy's saved OAuth login.
Using OpenClaw? See the OpenClaw integration guide to import its coding agents or drive a live OpenClaw Gateway session over ACP.
Two more coding agents are built in but have no omnigent launcher of
their own, because each ships a CLI that holds its own login. Install the vendor
CLI, log in with it, then name the harness:
# Grok Build (xAI)
curl -fsSL https://x.ai/cli/install.sh | bash
grok login --device-auth              # xAI OAuth
omnigent run --harness grok           # 'grok-build' also works
Devin (Cognition)
curl -fsSL https://cli.devin.ai/install.sh | bash
devin auth login
omnigent run --harness devin
Both speak the Agent Client Protocol over
stdio, and Omnigent stores no credential for either — each CLI reads back the
login it wrote to disk. That also means --model is refused rather than
silently dropped: both run their account-default model. To pin one, configure an
acp: agent whose command passes the vendor's own model flag.
Use the vendor login rather than an API key. A builtin ACP row has no
env_passthrough of its own, and XAI_API_KEY is not in the host-to-runner
credential allowlist, so exporting it in your shell does not reach the agent.
If you need the key route, pass it explicitly with
OMNIGENT_RUNNER_ENV_PASSTHROUGH=XAI_API_KEY, or configure an acp: agent that
declares the passthrough.
Two example agents ship with the repo, and they make good first sessions:
omnigent run examples/polly/
omnigent run examples/debby/
omnigent run examples/deep-research/
...or on a different harness (sub-agents keep their own):
omnigent run examples/polly/ --harness
omnigent run examples/debby/ --harness
🐙 Polly is a multi-agent coding orchestrator who writes no code herself. She's the tech lead: she plans, delegates the work to coding sub-agents (Claude Code, Codex, or Pi) in parallel git worktrees, then routes each diff to a reviewer from a different vendor than the one that wrote it. You merge.
🟠🔵 Debby is a brainstorming partner with two heads, one Claude and one GPT.
Every question you ask goes to both heads, and she lays the two answers out
side by side. Type /debate and the heads critique each other for a few
rounds before converging. (She needs both a Claude and an OpenAI credential;
see step 3.)
🔎 Deep Research is a single agent that answers a question with a cited,
cross-checked report. It plans sub-queries, searches the live web and reads
full pages through an MCP search server, and verifies each claim across
independent sources. It's also the simplest example to copy from: one agent
plus one tools/mcp/*.yaml server, no sub-agents.
Prefer the browser? One command starts the local server and registers this machine as a host:
omnigent start # starts the local server and registers this machine as a host
Open the server URL it prints, hit New Chat, pick your machine, and go.
Check status with omnigent server status; stop everything with
omnigent stop.
To suppress the automatic browser tab, use omni host --no-open or set
OMNIGENT_HOST_NO_OPEN=1 in your shell. Both also apply to `omni host
--background and omni start`. Sign-in may still open a browser; use
--non-interactive in scripts to fail if sign-in is required.
A session can also start itself: the Automations page runs an agent on a recurring schedule. See the automations guide for the schedule format, the REST API, and the current limits.
Set additional natural-language requirements for the isolated title generator:
omnigent config set --global \
  'session_title_instructions=Prefix titles with the current date as lowercase mon-dd. Use PR-number-short-name for pull requests, issue-number-short-description for issues, and a short snake_case activity otherwise.'
The title generator receives the current date as YYYY-MM-DD, then applies
these requirements to the first user message. The setting is server-owned and
does not alter an agent's portable instructions. Default generated titles are
limited to 100 characters; custom title requirements may use up to 200.
Default titles over 100 characters are rejected, leaving the first-message
fallback title in place. Custom titles over 200 characters are truncated with
a trailing ellipsis. Manually assigned titles are also limited to 200
characters. The setting applies after the local Omnigent server restarts, both
to new sessions and to later agent-initiated renames through sys_session_rename.
Agent proposals are formatted using the same title requirements; if formatting
fails, the existing title is preserved. Manual renames remain unchanged.
For longer instructions, edit ~/.omnigent/config.yaml directly and use a YAML
block scalar:
session_title_instructions: |
  Prefix every title with the current date as lowercase mon-dd.
  For pull requests use mon-dd-PR-number-short-name.
  For issues use mon-dd-issue-number-short-description.
  For other work use mon-dd-short_snake_case_activity.
Server operators can set the same key in the YAML passed to
omnigent server --config.
omnigent setup
Add a credential, set a default, or remove one, grouped by agent. Omnigent works with four kinds of credentials:
| | Kind | What it is |
|---|---|---|
| 🔑 | API key | A first-party vendor key for Anthropic, OpenAI, and similar providers |
| 🎟️ | Subscription | A Claude Pro/Max or ChatGPT plan, via the official claude / codex CLIs |
| 🌐 | Gateway | Any OpenAI- or Anthropic-compatible base_url and key (OpenRouter, LiteLLM, Ollama, vLLM, Azure) |
| 🧱 | Databricks | A Databricks workspace profile (requires the databricks extra) |
Defaults are per agent, so a Claude default and a Codex default coexist. You
can also switch models in the middle of a session with the /model command.
When you add a Gateway credential, omnigent setup asks for a base URL
and a key. The base URL depends on which agent you point it at:
| Provider | For | Base URL | Key |
|---|---|---|---|
| OpenRouter | Claude Code | https://openrouter.ai/api | your OpenRouter key (sk-or-…) |
| OpenRouter | Codex / OpenAI agents | https://openrouter.ai/api/v1 | your OpenRouter key (sk-or-…) |
| Ollama (local) | Codex / OpenAI agents | http://localhost:11434/v1 | any value (Ollama ignores it) |
For Claude Code, point at OpenRouter's Anthropic-compatible endpoint
(…/api, not …/api/v1). For Codex and the OpenAI-agents harness, use
the OpenAI-compatible …/api/v1.
Run Omnigent on a server with a stable URL
(deploy/README.md is the full guide) and your sessions
become reachable from anywhere, including your phone. The web UI is built for
mobile, so you get the same chat, sub-agents, terminals, and files, in sync
with your laptop.
One docker compose up runs the server on any host you have (a VPS, a home
server); Render and Railway deploy with one click; Fly.io, Hugging
Face Spaces, Modal, Cloudflare (serverless, scale-to-zero), and
Databricks Apps (backed by Lakebase Postgres and Unity Catalog Volumes) are
covered too — and a Cloudflare quick tunnel (public) or Tailscale
(private) reaches a server running on your own laptop without a deploy. The
server can also provision a cloud sandbox per session (managed hosts), so no
laptop has to stay online. The full menu of targets, the database options, the
sandbox setup, and
branding/white-labeling
live in
deploy/README.md.
Once the server is up, sign in and register your laptop as a host:
omnigent login https://your-host    # sign in once; run / attach / host reuse the token
omnigent host  https://your-host    # new sessions can now run on this machine
[!TIP]
On your own network you don't need a deploy. Open your machine's LAN
address on your phone (e.g. http://192.168.x.x:6767).
Omnigent supports multi-user accounts, controlled by one environment variable:
OMNIGENT_AUTH_ENABLED=1 omnigent server --background
The Docker deploy in step 4
turns it on for you (OMNIGENT_AUTH_ENABLED defaults to 1 there).
Open the web UI (http://localhost:6767 locally, or your host's URL) and
sign in as admin; first run prints the password and saves it locally. Then
open Admin → Members → Invite to create a single-use invite link, no
email server needed. Send it over; your teammate opens it, sets a password,
and they're in. Signup is invite-only.
[!NOTE]
Teammates need to be able to reach the server. A local server is only
reachable on your network; for anyone off it, deploy an always-on host
(see step 4).
omnigent attach <session_id>
omnigent run --fork <session_id>
[!TIP]
Want your team to sign in with the logins they already have (Google,
GitHub, Okta, Microsoft)? Set OMNIGENT_OIDC_ISSUER plus a client ID
and secret on your deployed server and restart. The full walkthrough,
domain allowlists, and the proxy-only header auth mode are covered in
deploy/README.md#auth.Policies decide what an agent may do: run shell commands, edit files, spend tokens. They check every action and either allow it, block it, or pause to ask you first.
Want defaults that apply to everyone, or to a specific agent? Define them in your server config or an agent's YAML:
policies:
  approve_shell:
    type: function
    handler: omnigent.policies.builtins.safety.ask_on_os_tools   # ask before shell / file writes
  cap_calls:
    type: function
    handler: omnigent.policies.builtins.safety.max_tool_calls_per_session
    factory_params:
      limit: 50                    # cap how many tools one session can call
  budget:
    type: function
    handler: omnigent.policies.builtins.cost.cost_budget
    factory_params:
      max_cost_usd: 5.00           # hard spend cap...
      ask_thresholds_usd: [3.00]   # ...with a soft warning on the way
Policies stack across three levels, server-wide (admin), per-agent (developer), and per-session (you), with the stricter session rules checked first. Spend caps and access limits ship as builtins.
See the
→ →
→ →
→ →
→ →
→ →
→ →
→ →
→