1
 →
→
Implementation of DALL-E 2, OpenAI's updated text-to-image synthesis neural network, in Pytorch
lucidrains/DALLE2-pytorch is an open-source project on GitHub, mainly written in Python. Implementation of DALL-E 2, OpenAI's updated text-to-image synthesis neural network, in Pytorch It currently holds 11,299 stars and 0 forks with 0 open issues, and was last pushed on an unknown date (repository created unknown).
AI Homed tracks it on the AI Image Projects board and on the AI AI Image Projects list.
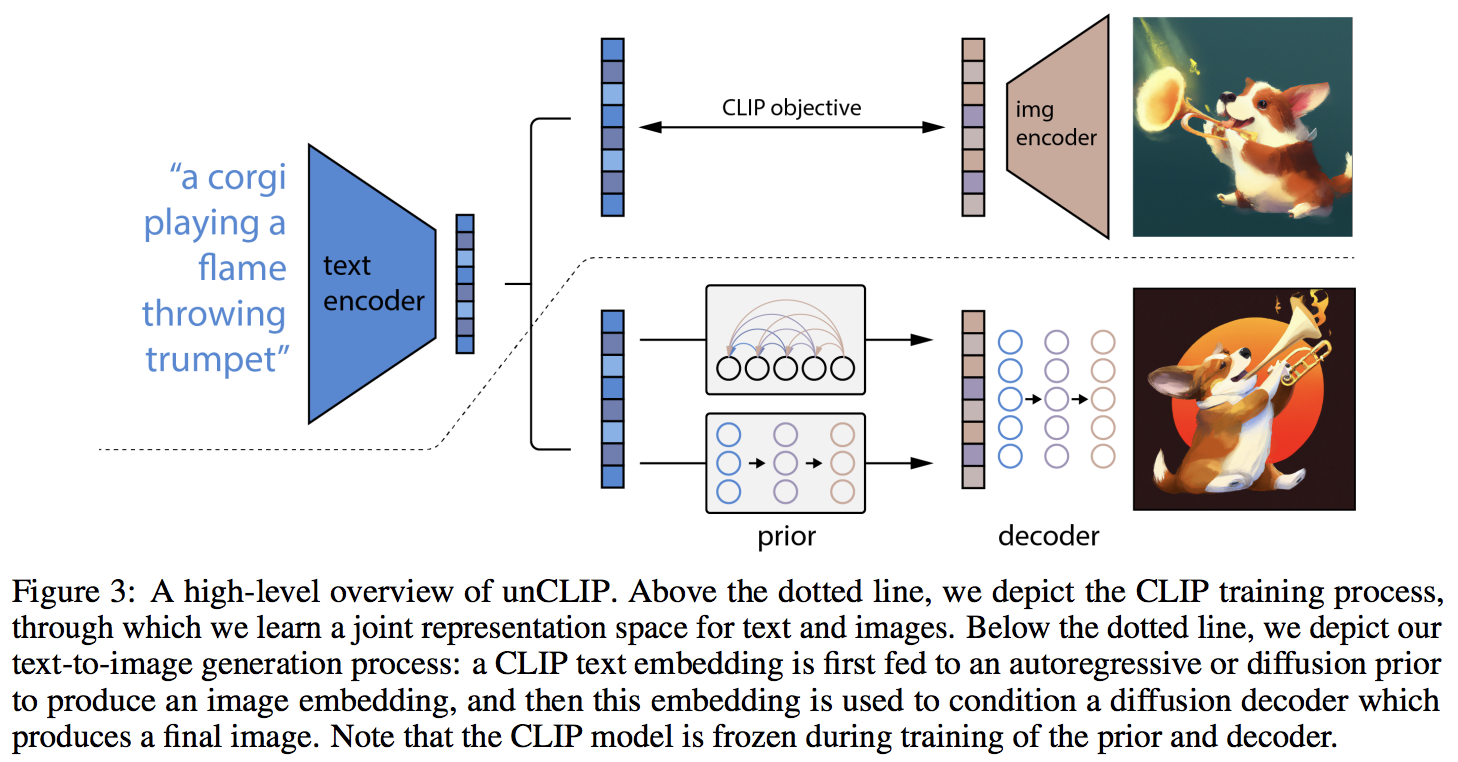
Implementation of DALL-E 2, OpenAI's updated text-to-image synthesis neural network, in Pytorch.
Yannic Kilcher summary | AssemblyAI explainer
The main novelty seems to be an extra layer of indirection with the prior network (whether it is an autoregressive transformer or a diffusion network), which predicts an image embedding based on the text embedding from CLIP. Specifically, this repository will only build out the diffusion prior network, as it is the best performing variant (but which incidentally involves a causal transformer as the denoising network 😂)
This model is SOTA for text-to-image for now.
Please join if you are interested in helping out with the replication with the LAION community | Yannic Interview
As of 5/23/22, it is no longer SOTA. SOTA will be here. Jax versions as well as text-to-video project will be shifted towards the Imagen architecture, as it is way simpler.
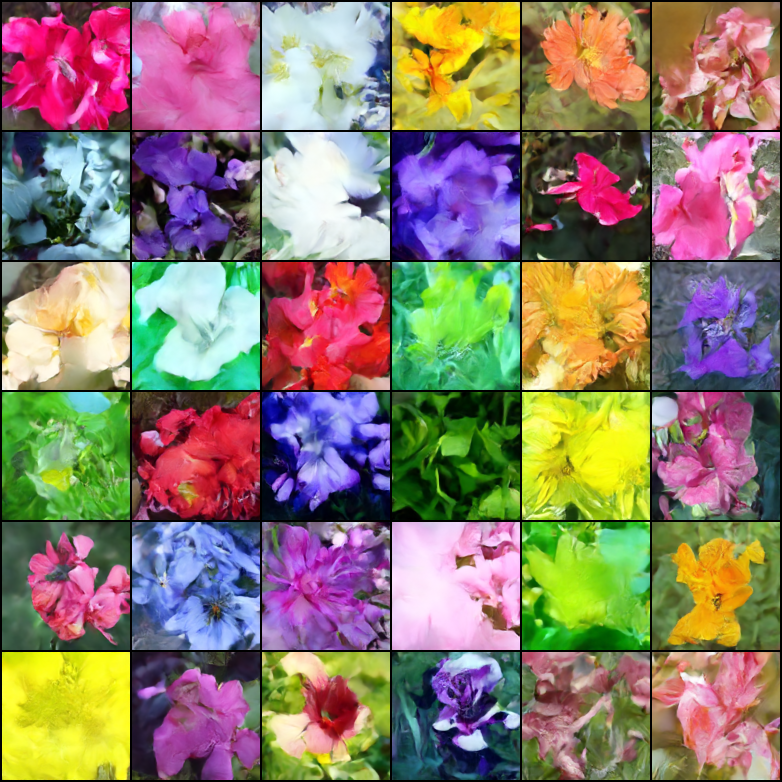
ongoing at 21k steps
This library would not have gotten to this working state without the help of
$ pip install dalle2-pytorch
To train DALLE-2 is a 3 step process, with the training of CLIP being the most important
To train CLIP, you can either use x-clip package, or join the LAION discord, where a lot of replication efforts are already underway.
This repository will demonstrate integration with x-clip for starters
import torch
from dalle2_pytorch import CLIP
clip = CLIP(
    dim_text = 512,
    dim_image = 512,
    dim_latent = 512,
    num_text_tokens = 49408,
    text_enc_depth = 1,
    text_seq_len = 256,
    text_heads = 8,
    visual_enc_depth = 1,
    visual_image_size = 256,
    visual_patch_size = 32,
    visual_heads = 8,
    use_all_token_embeds = True,            # whether to use fine-grained contrastive learning (FILIP)
    decoupled_contrastive_learning = True,  # use decoupled contrastive learning (DCL) objective function, removing positive pairs from the denominator of the InfoNCE loss (CLOOB + DCL)
    extra_latent_projection = True,         # whether to use separate projections for text-to-image vs image-to-text comparisons (CLOOB)
    use_visual_ssl = True,                  # whether to do self supervised learning on images
    visual_ssl_type = 'simclr',             # can be either 'simclr' or 'simsiam', depending on using DeCLIP or SLIP
    use_mlm = False,                        # use masked language learning (MLM) on text (DeCLIP)
    text_ssl_loss_weight = 0.05,            # weight for text MLM loss
    image_ssl_loss_weight = 0.05            # weight for image self-supervised learning loss
).cuda()
mock data
text = torch.randint(0, 49408, (4, 256)).cuda()
images = torch.randn(4, 3, 256, 256).cuda()
train
loss = clip(
    text,
    images,
    return_loss = True              # needs to be set to True to return contrastive loss
)
loss.backward()
do the above with as many texts and images as possible in a loop
Then, you will need to train the decoder, which learns to generate images based on the image embedding coming from the trained CLIP above
import torch
from dalle2_pytorch import Unet, Decoder, CLIP
trained clip from step 1
clip = CLIP(
    dim_text = 512,
    dim_image = 512,
    dim_latent = 512,
    num_text_tokens = 49408,
    text_enc_depth = 1,
    text_seq_len = 256,
    text_heads = 8,
    visual_enc_depth = 1,
    visual_image_size = 256,
    visual_patch_size = 32,
    visual_heads = 8
).cuda()
unet for the decoder
unet = Unet(
    dim = 128,
    image_embed_dim = 512,
    cond_dim = 128,
    channels = 3,
    dim_mults=(1, 2, 4, 8)
).cuda()
decoder, which contains the unet and clip
decoder = Decoder(
    unet = unet,
    clip = clip,
    timesteps = 100,
    image_cond_drop_prob = 0.1,
    text_cond_drop_prob = 0.5
).cuda()
mock images (get a lot of this)
images = torch.randn(4, 3, 256, 256).cuda()
feed images into decoder
loss = decoder(images)
loss.backward()
do the above for many many many many steps
then it will learn to generate images based on the CLIP image embeddings
Finally, the main contribution of the paper. The repository offers the diffusion prior network. It takes the CLIP text embeddings and tries to generate the CLIP image embeddings. Again, you will need the trained CLIP from the first step
import torch
from dalle2_pytorch import DiffusionPriorNetwork, DiffusionPrior, CLIP
get trained CLIP from step one
clip = CLIP(
    dim_text = 512,
    dim_image = 512,
    dim_latent = 512,
    num_text_tokens = 49408,
    text_enc_depth = 6,
    text_seq_len = 256,
    text_heads = 8,
    visual_enc_depth = 6,
    visual_image_size = 256,
    visual_patch_size = 32,
    visual_heads = 8,
).cuda()
setup prior network, which contains an autoregressive transformer
prior_network = DiffusionPriorNetwork(
    dim = 512,
    depth = 6,
    dim_head = 64,
    heads = 8
).cuda()
diffusion prior network, which contains the CLIP and network (with transformer) above
diffusion_prior = DiffusionPrior(
    net = prior_network,
    clip = clip,
    timesteps = 100,
    cond_drop_prob = 0.2
).cuda()
mock data
text = torch.randint(0, 49408, (4, 256)).cuda()
images = torch.randn(4, 3, 256, 256).cuda()
feed text and images into diffusion prior network
loss = diffusion_prior(text, images)
loss.backward()
do the above for many many many steps
now the diffusion prior can generate image embeddings from the text embeddings
In the paper, they actually used a recently discovered technique, from Jonathan Ho himself (original author of DDPMs, the core technique used in DALL-E v2) for high resolution image synthesis.
This can easily be used within this framework as so
import torch
from dalle2_pytorch import Unet, Decoder, CLIP
trained clip from step 1
clip = CLIP(
    dim_text = 512,
    dim_image = 512,
    dim_latent = 512,
    num_text_tokens = 49408,
    text_enc_depth = 6,
    text_seq_len = 256,
    text_heads = 8,
    visual_enc_depth = 6,
    visual_image_size = 256,
    visual_patch_size = 32,
    visual_heads = 8
).cuda()
2 unets for the decoder (a la cascading DDPM)
unet1 = Unet(
    dim = 32,
    image_embed_dim = 512,
    cond_dim = 128,
    channels = 3,
    dim_mults = (1, 2, 4, 8)
).cuda()
unet2 = Unet(
    dim = 32,
    image_embed_dim = 512,
    cond_dim = 128,
    channels = 3,
    dim_mults = (1, 2, 4, 8, 16)
).cuda()
decoder, which contains the unet(s) and clip
decoder = Decoder(
    clip = clip,
    unet = (unet1, unet2),            # insert both unets in order of low resolution to highest resolution (you can have as many stages as you want here)
    image_sizes = (256, 512),         # resolutions, 256 for first unet, 512 for second. these must be unique and in ascending order (matches with the unets passed in)
    timesteps = 1000,
    image_cond_drop_prob = 0.1,
    text_cond_drop_prob = 0.5
).cuda()
mock images (get a lot of this)
images = torch.randn(4, 3, 512, 512).cuda()
feed images into decoder, specifying which unet you want to train
each unet can be trained separately, which is one of the benefits of the cascading DDPM scheme
loss = decoder(images, unet_number = 1)
loss.backward()
loss = decoder(images, unet_number = 2)
loss.backward()
do the above for many steps for both unets
Finally, to generate the DALL-E2 images from text. Insert the trained DiffusionPrior as well as the Decoder (which wraps CLIP, the causal transformer, and unet(s))
from dalle2_pytorch import DALLE2
dalle2 = DALLE2(
    prior = diffusion_prior,
    decoder = decoder
)
send the text as a string if you want to use the simple tokenizer from DALLE v1
or you can do it as token ids, if you have your own tokenizer
texts = ['glistening morning dew on a flower petal']
images = dalle2(texts) # (1, 3, 256, 256)
That's it!
Let's see the whole script below
import torch
from dalle2_pytorch import DALLE2, DiffusionPriorNetwork, DiffusionPrior, Unet, Decoder, CLIP
clip = CLIP(
    dim_text = 512,
    dim_image = 512,
    dim_latent = 512,
    num_text_tokens = 49408,
    text_enc_depth = 6,
    text_seq_len = 256,
    text_heads = 8,
    visual_enc_depth = 6,
    visual_image_size = 256,
    visual_patch_size = 32,
    visual_heads = 8
).cuda()
mock data
text = torch.randint(0, 49408, (4, 256)).cuda()
images = torch.randn(4, 3, 256, 256).cuda()
train
loss = clip(
    text,
    images,
    return_loss = True
)
loss.backward()
do above for many steps ...
prior networks (with transformer)
prior_network = DiffusionPriorNetwork(
    dim = 512,
    depth = 6,
    dim_head = 64,
    heads = 8
).cuda()
diffusion_prior = DiffusionPrior(
    net = prior_network,
    clip = clip,
    timesteps = 1000,
    sample_timesteps = 64,
    cond_drop_prob = 0.2
).cuda()
loss = diffusion_prior(text, images)
loss.backward()
do above for many steps ...
decoder (with unet)
unet1 = Unet(
    dim = 128,
    image_embed_dim = 512,
    text_embed_dim = 512,
    cond_dim = 128,
    channels = 3,
    dim_mults=(1, 2, 4, 8),
    cond_on_text_encodings = True    # set to True for any unets that need to be conditioned on text encodings
).cuda()
unet2 = Unet(
    dim = 16,
    image_embed_dim = 512,
    cond_dim = 128,
    channels = 3,
    dim_mults = (1, 2, 4, 8, 16)
).cuda()
decoder = Decoder(
    unet = (unet1, unet2),
    image_sizes = (128, 256),
    clip = clip,
    timesteps = 100,
    image_cond_drop_prob = 0.1,
    text_cond_drop_prob = 0.5
).cuda()
for unet_number in (1, 2):
    loss = decoder(images, text = text, unet_number = unet_number) # this can optionally be decoder(images, text) if you wish to condition on the text encodings as well, though it was hinted in the paper it didn't do much
    loss.backward()
do above for many steps
dalle2 = DALLE2(
    prior = diffusion_prior,
    decoder = decoder
)
images = dalle2(
    ['cute puppy chasing after a squirrel'],
    cond_scale = 2. # classifier free guidance strength (> 1 would strengthen the condition)
)
save your image (in this example, of size 256x256)
Everything in this readme should run without error
You can also train the decoder on images of greater than the size (say 512x512) at which CLIP was trained (256x256). The images will be resized to CLIP image resolution for the image embeddings
For the layperson, no worries, training will all be automated into a CLI tool, at least for small scale training.
It is likely, when scaling up, that you would first preprocess your images and text into corresponding embeddings before training the prior network. You can do so easily by simply passing in image_embed, text_embed, and optionally text_encodings
Working example below
import torch
from dalle2_pytorch import DiffusionPriorNetwork, DiffusionPrior, CLIP
get trained CLIP from step one
clip = CLIP(
    dim_text = 512,
    dim_image = 512,
    dim_latent = 512,
    num_text_tokens = 49408,
    text_enc_depth = 6,
    text_seq_len = 256,
    text_heads = 8,
    visual_enc_depth = 6,
    visual_image_size = 256,
    visual_patch_size = 32,
    visual_heads = 8,
).cuda()
setup prior network, which contains an autoregressive transformer
prior_network = DiffusionPriorNetwork(
    dim = 512,
    depth = 6,
    dim_head = 64,
    heads = 8
).cuda()
diffusion prior network, which contains the CLIP and network (with transformer) above
diffusion_prior = DiffusionPrior(
    net = prior_network,
    clip = clip,
    timesteps = 100,
    cond_drop_prob = 0.2,
    condition_on_text_encodings = False  # this probably should be true, but just to get Laion started
).cuda()
mock data
text = torch.randint(0, 49408, (4, 256)).cuda()
images = torch.randn(4, 3, 256, 256).cuda()
precompute the text and image embeddings
here using the diffusion prior class, but could be done with CLIP alone
clip_image_embeds = diffusion_prior.clip.embed_image(images).image_embed
clip_text_embeds = diffusion_prior.clip.embed_text(text).text_embed
feed text and images into diffusion prior network
loss = diffusion_prior(
    text_embed = clip_text_embeds,
    image_embed = clip_image_embeds
)
loss.backward()
do the above for many many many steps
now the diffusion prior can generate image embeddings from the text embeddings
You can also completely go CLIP-less, in which case you will need to pass in the image_embed_dim into the DiffusionPrior on initialization
import torch
from dalle2_pytorch import DiffusionPriorNetwork, DiffusionPrior
setup prior network, which contains an autoregressive transformer
prior_network = DiffusionPriorNetwork(
    dim = 512,
    depth = 6,
    dim_head = 64,
    heads = 8
).cuda()
diffusion prior network, which contains the CLIP and network (with transformer) above
diffusion_prior = DiffusionPrior(
    net = prior_network,
    image_embed_dim = 512,               # this needs to be set
    timesteps = 100,
    cond_drop_prob = 0.2,
    condition_on_text_encodings = False  # this probably should be true, but just to get Laion started
).cuda()
mock data
text = torch.randint(0, 49408, (4, 256)).cuda()
images = torch.randn(4, 3, 256, 256).cuda()
precompute the text and image embeddings
here using the diffusion prior class, but could be done with CLIP alone
clip_image_embeds = torch.randn(4, 512).cuda()
clip_text_embeds = torch.randn(4, 512).cuda()
feed text and images into diffusion prior network
loss = diffusion_prior(
    text_embed = clip_text_embeds,
    image_embed = clip_image_embeds
)
loss.backward()
do the above for many many many steps
now the diffusion prior can generate image embeddings from the text embeddings
Although there is the possibility they are using an unreleased, more powerful CLIP, you can use one of the released ones, if you do not wish to train your own CLIP from scratch. This will also allow the community to more quickly validate the conclusions of the paper.
To use a pretrained OpenAI CLIP, simply import OpenAIClipAdapter and pass it into the DiffusionPrior or Decoder like so
import torch
from dalle2_pytorch import DALLE2, DiffusionPriorNetwork, DiffusionPrior, Unet, Decoder, OpenAIClipAdapter
openai pretrained clip - defaults to ViT-B/32
clip = OpenAIClipAdapter()
mock data
text = torch.randint(0, 49408, (4, 256)).cuda()
images = torch.randn(4, 3, 256, 256).cuda()
prior networks (with transformer)
prior_network = DiffusionPriorNetwork(
    dim = 512,
    depth = 6,
    dim_head = 64,
    heads = 8
).cuda()
diffusion_prior = DiffusionPrior(
    net = prior_network,
    clip = clip,
    timesteps = 100,
    cond_drop_prob = 0.2
).cuda()
loss = diffusion_prior(text, images)
loss.backward()
do above for many steps ...
decoder (with unet)
unet1 = Unet(
    dim = 128,
    image_embed_dim = 512,
    cond_dim = 128,
    channels = 3,
    dim_mults=(1, 2, 4, 8),
    text_embed_dim = 512,
    cond_on_text_encodings = True  # set to True for any unets that need to be conditioned on text encodings (ex. first unet in cascade)
).cuda()
unet2 = Unet(
    dim = 16,
    image_embed_dim = 512,
    cond_dim = 128,
    channels = 3,
    dim_mults = (1, 2, 4, 8, 16)
).cuda()
decoder = Decoder(
    unet = (unet1, unet2),
    image_sizes = (128, 256),
    clip = clip,
    timesteps = 1000,
    sample_timesteps = (250, 27),
    image_cond_drop_prob = 0.1,
    text_cond_drop_prob = 0.5
).cuda()
for unet_number in (1, 2):
    loss = decoder(images, text = text, unet_number = unet_number) # this can optionally be decoder(images, text) if you wish to condition on the text encodings as well, though it was hinted in the paper it didn't do much
    loss.backward()
do above for many steps
dalle2 = DALLE2(
    prior = diffusion_prior,
    decoder = decoder
)
images = dalle2(
    ['a butterfly trying to escape a tornado'],
    cond_scale = 2. # classifier free guidance strength (> 1 would strengthen the condition)
)
save your image (in this example, of size 256x256)
Alternatively, you can also use Open Clip
$ pip install open-clip-torch
Ex. using the SOTA Open Clip model trained by Romain
from dalle2_pytorch import OpenClipAdapter
clip = OpenClipAdapter('ViT-H/14')
Now you'll just have to worry about training the Prior and the Decoder!
Inpainting is also built into the Decoder. You simply have to pass in the inpaint_image and inpaint_mask (boolean tensor where True indicates which regions of the inpaint image to keep)
This repository uses the formulation put forth by Lugmayr et al. in Repaint
import torch
from dalle2_pytorch import Unet, Decoder, CLIP
trained clip from step 1
clip = CLIP(
    dim_text = 512,
    dim_image = 512,
    dim_latent = 512,
    num_text_tokens = 49408,
    text_enc_depth = 6,
    text_seq_len = 256,
    text_heads = 8,
    visual_enc_depth = 6,
    visual_image_size = 256,
    visual_patch_size = 32,
    visual_heads = 8
).cuda()
2 unets for the decoder (a la cascading DDPM)
unet = Unet(
    dim = 16,
    image_embed_dim = 512,
    cond_dim = 128,
    channels = 3,
    dim_mults = (1, 1, 1, 1)
).cuda()
decoder, which contains the unet(s) and clip
decoder = Decoder(
    clip = clip,
    unet = (unet,),               # insert both unets in order of low resolution to highest resolution (you can have as many stages as you want here)
    image_sizes = (256,),         # resolutions, 256 for first unet, 512 for second. these must be unique and in ascending order (matches with the unets passed in)
    timesteps = 1000,
    image_cond_drop_prob = 0.1,
    text_cond_drop_prob = 0.5
).cuda()
mock images (get a lot of this)
images = torch.randn(4, 3, 256, 256).cuda()
feed images into decoder, specifying which unet you want to train
each unet can be trained separately, which is one of the benefits of the cascading DDPM scheme
loss = decoder(images, unet_number = 1)
loss.backward()
do the above for many steps for both unets
mock_image_embed = torch.randn(1, 512).cuda()
then to do inpainting
inpaint_image = torch.randn(1, 3, 256, 256).cuda()      # (batch, channels, height, width)
inpaint_mask = torch.ones(1, 256, 256).bool().cuda()    # (batch, height, width)
inpainted_images = decoder.sample(
    image_embed = mock_image_embed,
    inpaint_image = inpaint_image,    # just pass in the inpaint image
    inpaint_mask = inpaint_mask       # and the mask
)
inpainted_images.shape # (1, 3, 256, 256)
This repository decides to take the next step and offer DALL-E v2 combined with latent diffusion, from Rombach et al.
You can use it as follows. Latent diffusion can be limited to just the first U-Net in the cascade, or to any number you wish.
The repository also comes equipped with all the necessary settings to recreate ViT-VQGan from the Improved VQGans paper. Furthermore, the vector quantization library also comes equipped to do residual or multi-headed quantization, which I believe will give an even further boost in performance to the autoencoder.
```python import torch from dalle2_pytorch import Unet, Decoder, CLIP, VQGanVAE
clip = CLIP( dim_text = 512, dim_image = 512, dim_latent = 512, num_text_tokens = 49408, text_enc_depth = 1, text_seq_len = 256, text_heads = 8, visual_enc_depth = 1, visual_image_size = 256, visual_patch_size = 32, visual_heads = 8 )
→ →→
→→ →
→ →→→
→→→ →
→