
1
 →
DIYgod/pinky is an open-source project on GitHub, mainly written in Go. Let AI agents use your phone, with you in the loop. It currently holds 1,406 stars and 148 forks with 8 open issues, and was last pushed on 2026-11-09 (repository created 2026-11-06).
AI Homed tracks it on the Today's Trending board, currently at rank #63 with 0 new stars today.

Let any AI agent use your iPhone or Android phone, from macOS, Windows or Linux, with you in the loop.
Download · Get started · FAQ · Discord
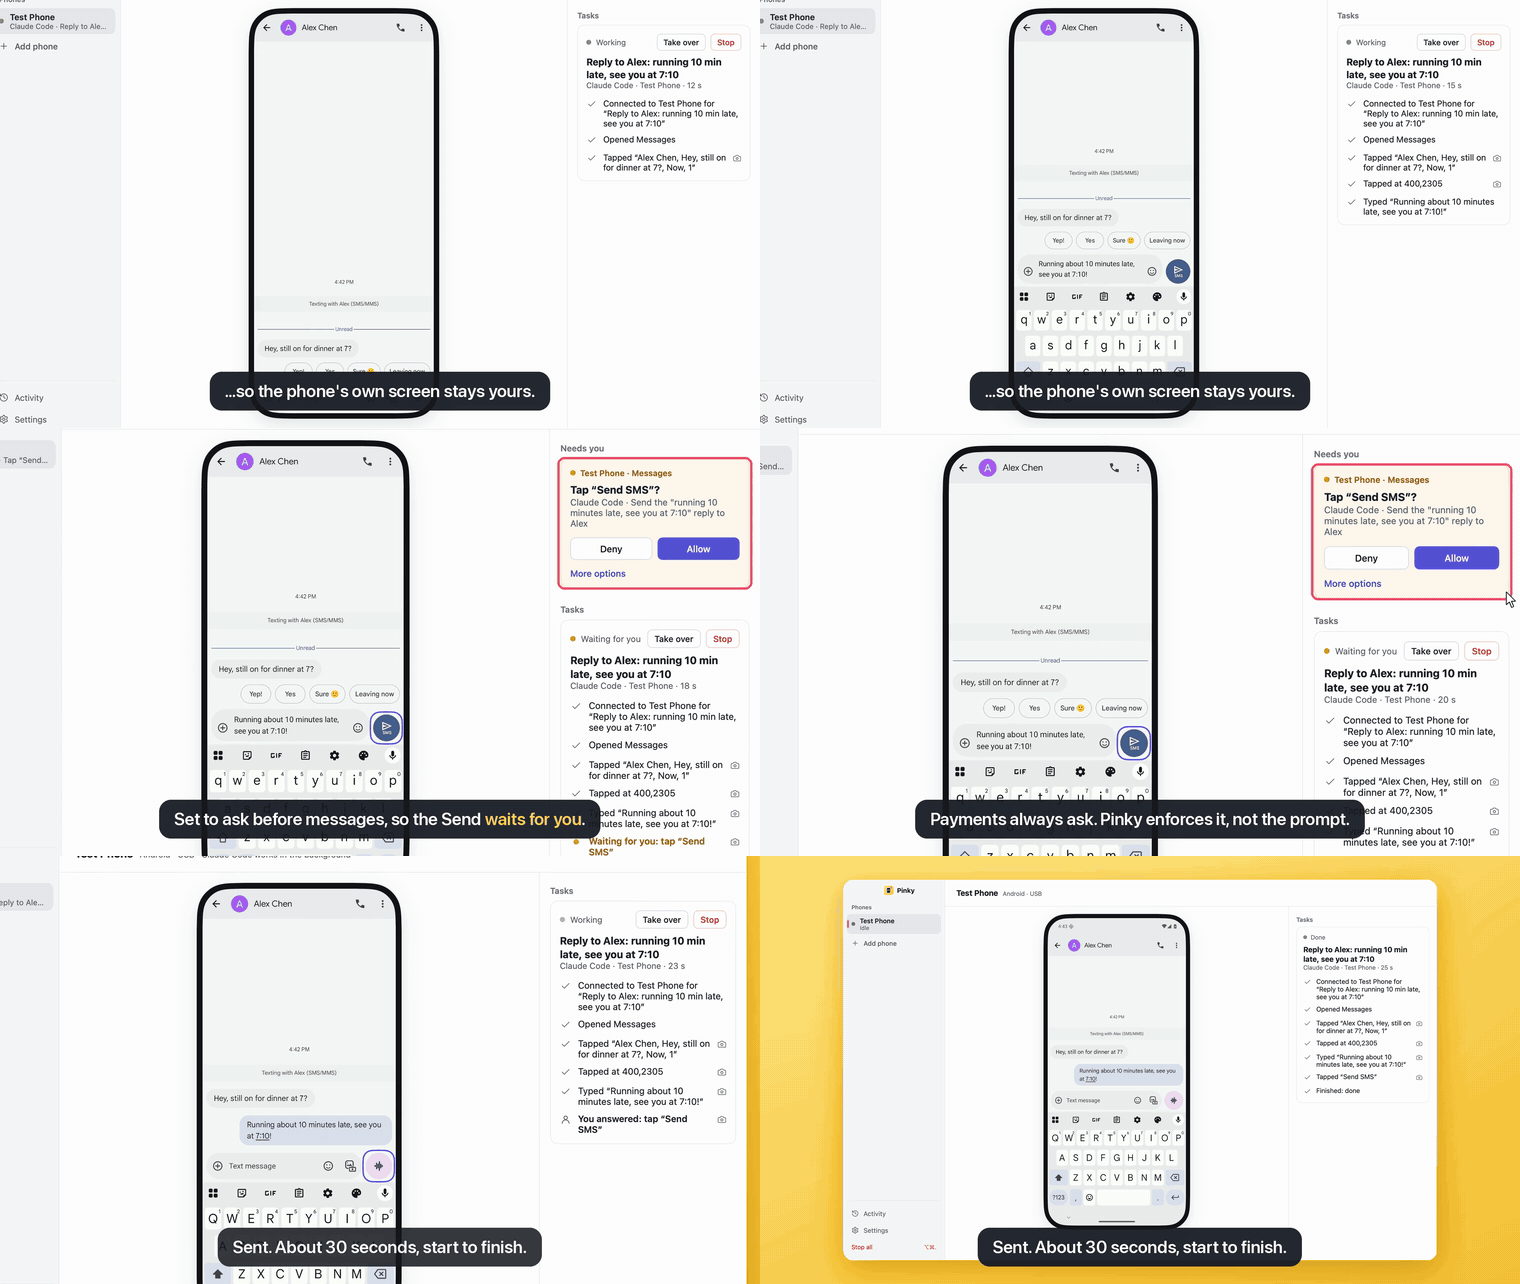
A real Claude Code run on an Android 16 emulator. Pinky asks before payments by default; this run also asks before messages.
Pinky lets any agent (Claude Code, Claude Desktop, Codex, Cursor or a script) operate a real iPhone or Android phone over MCP, while you watch on your computer, approve risky steps, take over and review what happened. Approvals are enforced by Pinky's gateway, not by instructions to the agent.
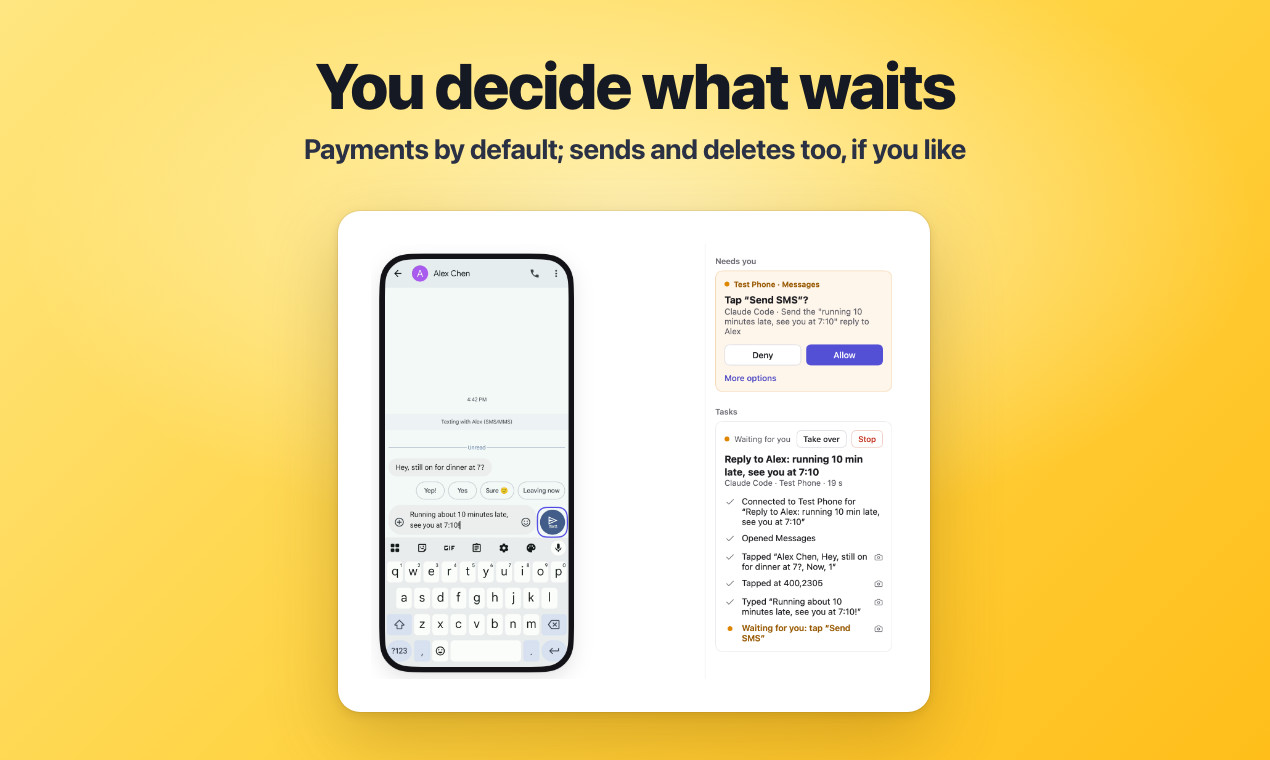 You approve the risky steps. Payments, trades and transfers wait for your click; in Settings › Safety you can have sends, orders, deletions, calls, installs, links that leave the app and settings changes wait too, or every step. Pinky spots these buttons in 10 languages. The rules run in Pinky's gateway, so an agent can't approve itself, even when text on the screen tries to talk it into it. |
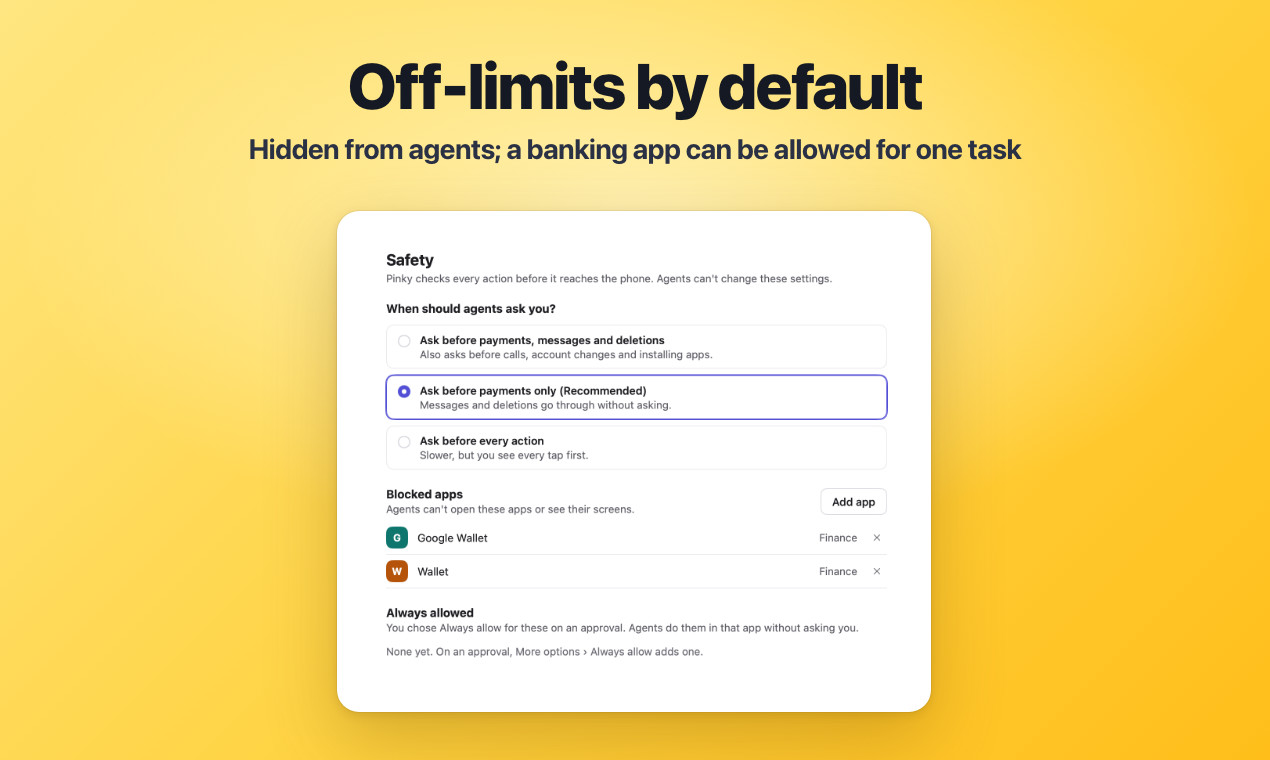 Off-limits by default. Banking, wallet and password-manager apps are invisible to agents, and agents can't type into password or one-time-code fields. When an agent needs a banking or wallet app for a task, it asks, and you can allow that app for that task only. Every new agent needs your approval and gets only the scope you give it. |
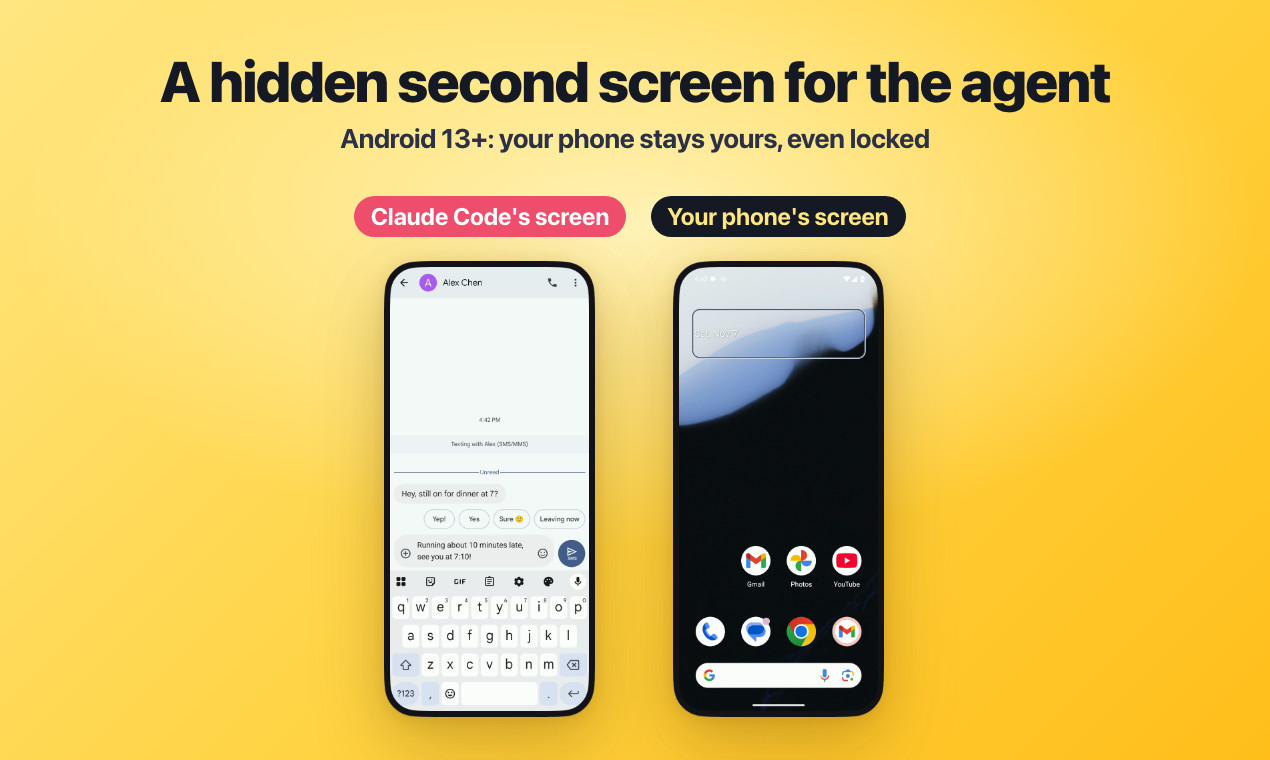 Your phone stays yours. On Android 13 and later, agents work on a hidden second screen, so the phone's own screen stays yours, or off and locked. On older Android phones and on iPhones they use the main screen. |
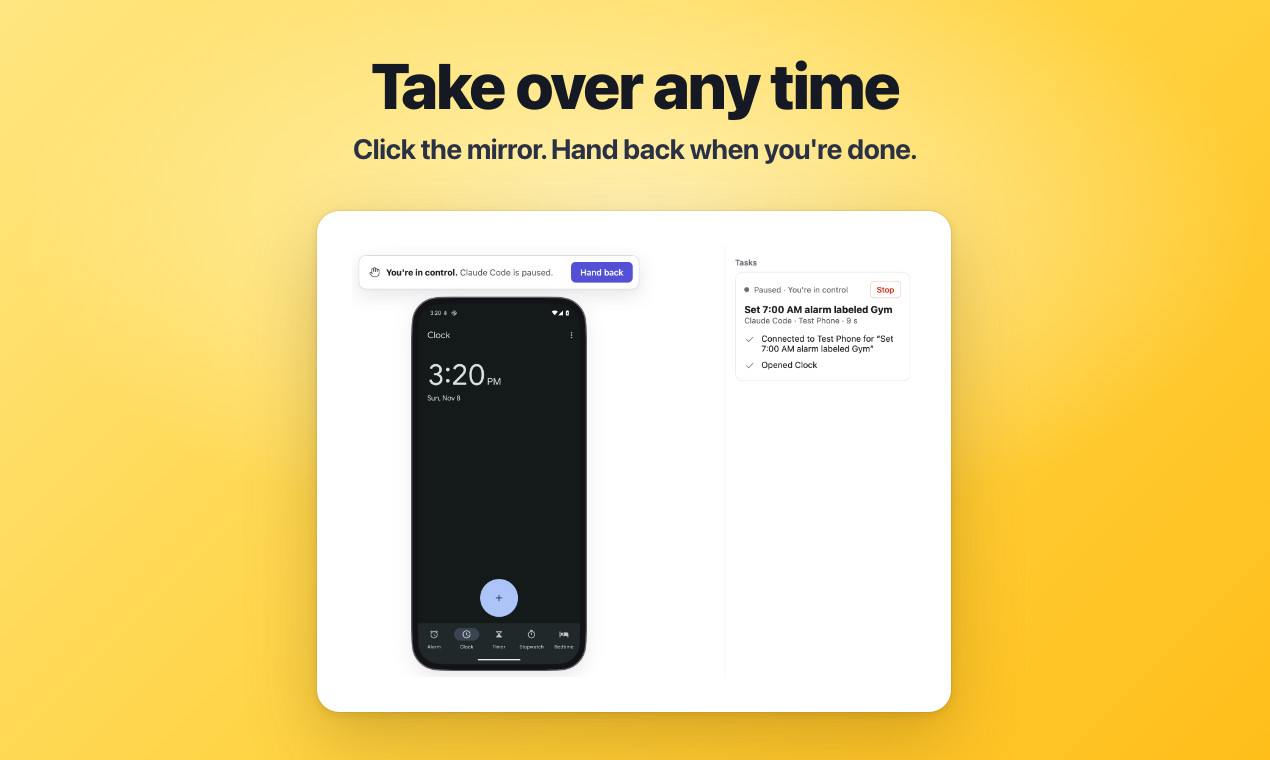 Take over any time. Click the mirror and the agent pauses until you hand back; on Android, touching the phone yourself pauses it too. Stop all is ⌥⌘. (Ctrl+Alt+. on Windows and Linux) from anywhere. |
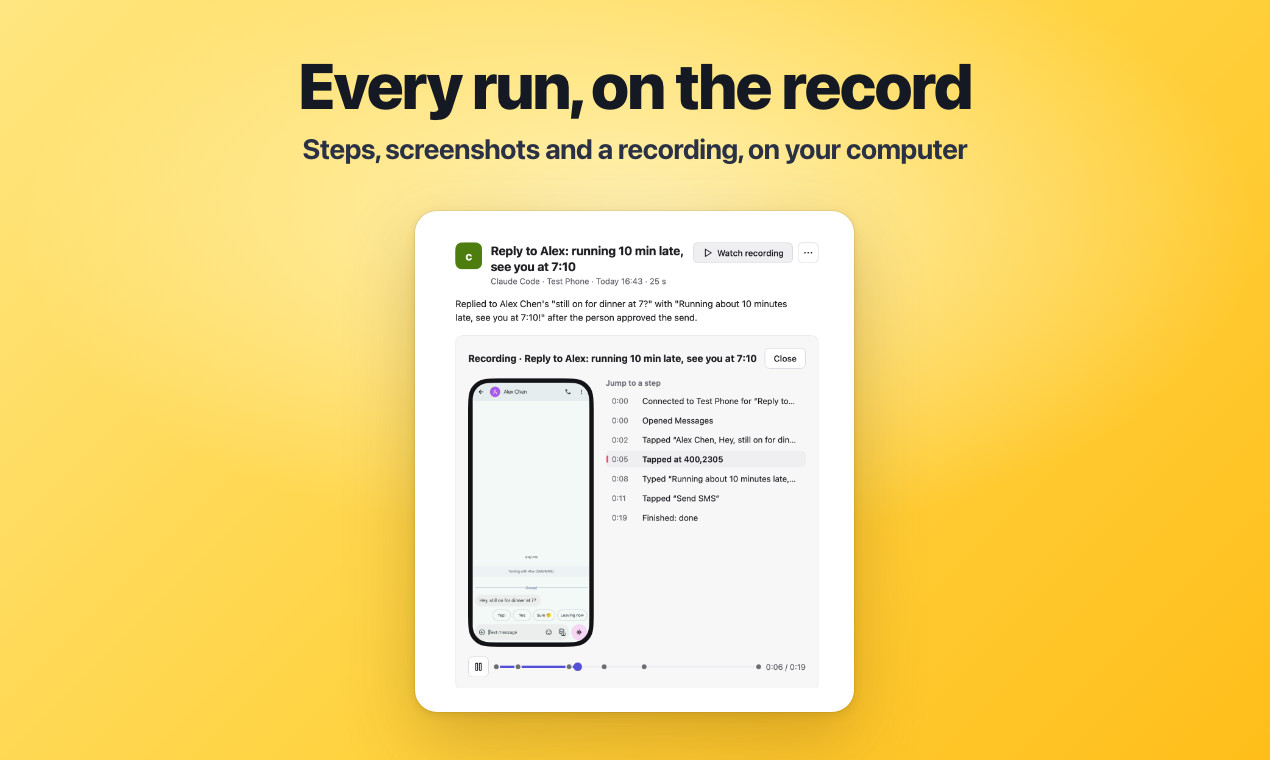 Every run is on the record. Each step in plain words, screenshots and a screen recording with a mark per step, exportable as an HTML report. It all stays on your computer. |
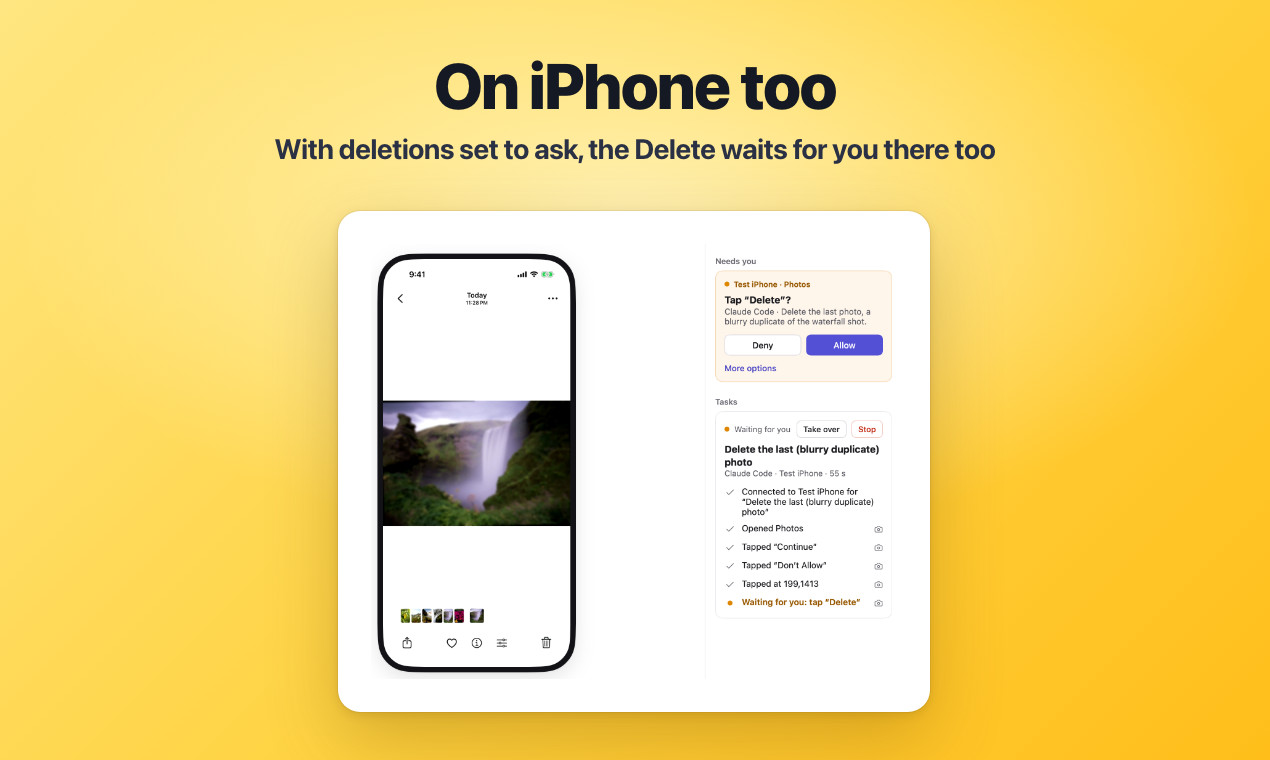 iPhones too. The same gateway, approvals and records work on iOS 17.4 and later (what works). Shown here on the iOS Simulator, with deletions set to ask. |
Status: pre-alpha. Claude Code has used real phones through it end to end (an Android phone over USB and an iPhone on iOS 27), and agents can connect over stdio or HTTP. Unlocking from the computer, background work on Android, recordings, export, Wi-Fi pairing and the phone's files are built; some of it still waits for a person to try it. See docs/ACCEPTANCE.md for what works today and how to try it.
Install Pinky, connect your phone and add Pinky to your agent. Then ask the agent to do something on the phone, and watch it work in Pinky's window.
| | You need | | --- | --- | | Mac | macOS 13 or later, with Apple silicon or Intel | | Windows | Windows 10 or 11, 64-bit (x64) | | Linux | A 64-bit PC (x86-64) with Ubuntu 20.04, Debian 11 or a newer system (glibc 2.29 or later), and GTK 3 | | Android phone | Android 10 to 17 and a USB cable. Pinky brings its own adb; on Windows some phones need a USB driver, and on Linux USB access (below) | | iPhone or iPad | iOS 17.4 or later, and a USB cable to set it up; afterwards it works over Wi-Fi too (below). Pinky prepares it itself, with Apple's developer disk image, which comes with Xcode or which Pinky can download from a third-party mirror when you ask (below). On iOS 17.4 to 26 also a helper app on the iPhone (below) | | Simulators and emulators | Optional, in place of a phone or next to one: an iOS Simulator on a Mac with Xcode, or an Android emulator from Android Studio. You create them there; Pinky starts them (below) | | Agent | Any agent that can use MCP servers, such as Claude Code, Claude Desktop, Codex or Cursor |
Get Pinky from the latest release:
pinky--arm64.dmg for a Mac with Apple silicon (M1 or later) or pinky--amd64.dmg for an Intel Mac. Open it and drag Pinky to Applications. With Homebrew, brew install --cask diygod/tap/pinky does the same.pinky-setup--amd64.exe and run it. It installs Pinky for your account, without administrator rights. The installer is not signed yet, so SmartScreen may say that Windows protected your PC: choose More info, then Run anyway. To use Pinky without installing it, unzip pinky--windows-amd64.zip and open Pinky.exe.pinky__amd64.deb and install it with sudo apt install ./pinky__amd64.deb. On other systems, unpack pinky--linux-amd64.tar.gz into a folder of its own and run pinky in it..tar.gz, installs them too (Updates).
Open Pinky and choose Add phone. A phone that is ready shows up in Pinky's window; when something is missing, the phone's page in Pinky says what.
Add phone › Android shows these steps for your phone's brand, with its own menu names and extra switches: Xiaomi, OPPO, vivo, HONOR, HUAWEI, Samsung and Pixel, and general steps for the rest.
1. On the phone, turn on USB debugging: in Settings › About phone, tap Build number 7 times, then turn on USB debugging in Settings › System › Developer options. Some brands name these menus a little differently. 2. Plug the phone into the computer. When the phone asks whether to allow USB debugging, tap Allow. On Android 11 and later you can pair it over Wi-Fi instead, from Add phone (when it fails). Android 10 has no Wireless debugging: once it is plugged in, Use Wi-Fi instead… moves it to Wi-Fi (below). 3. Pinky offers to install Pinky Companion, its app for the phone, which makes reading the screen many times faster and lets Pinky type in any language. The phone may ask you to allow the install once.
Each phone has a Checkup, in the ··· menu under its mirror, that lists what works and how to fix what doesn't, such as a Xiaomi's USB debugging (Security settings) switch.
Over Wi-Fi, Pinky makes sure the phone that answers is yours: it leaves a mark on each phone it sets up, which only the phone's debugging connection can read, and checks it whenever adb connects the phone, so another device on the network can't answer in its place. A phone connected over Wireless debugging that Pinky hasn't used, by another tool for example, shows as found on Wi-Fi, and Pinky leaves it alone until you choose Use. If a phone's page says This may not be … after you reset the phone or set it up again yourself, choose Trust this phone… there, or plug it in once.
Taking the phone out? With Tailscale, Pinky reaches it away from home too (how).
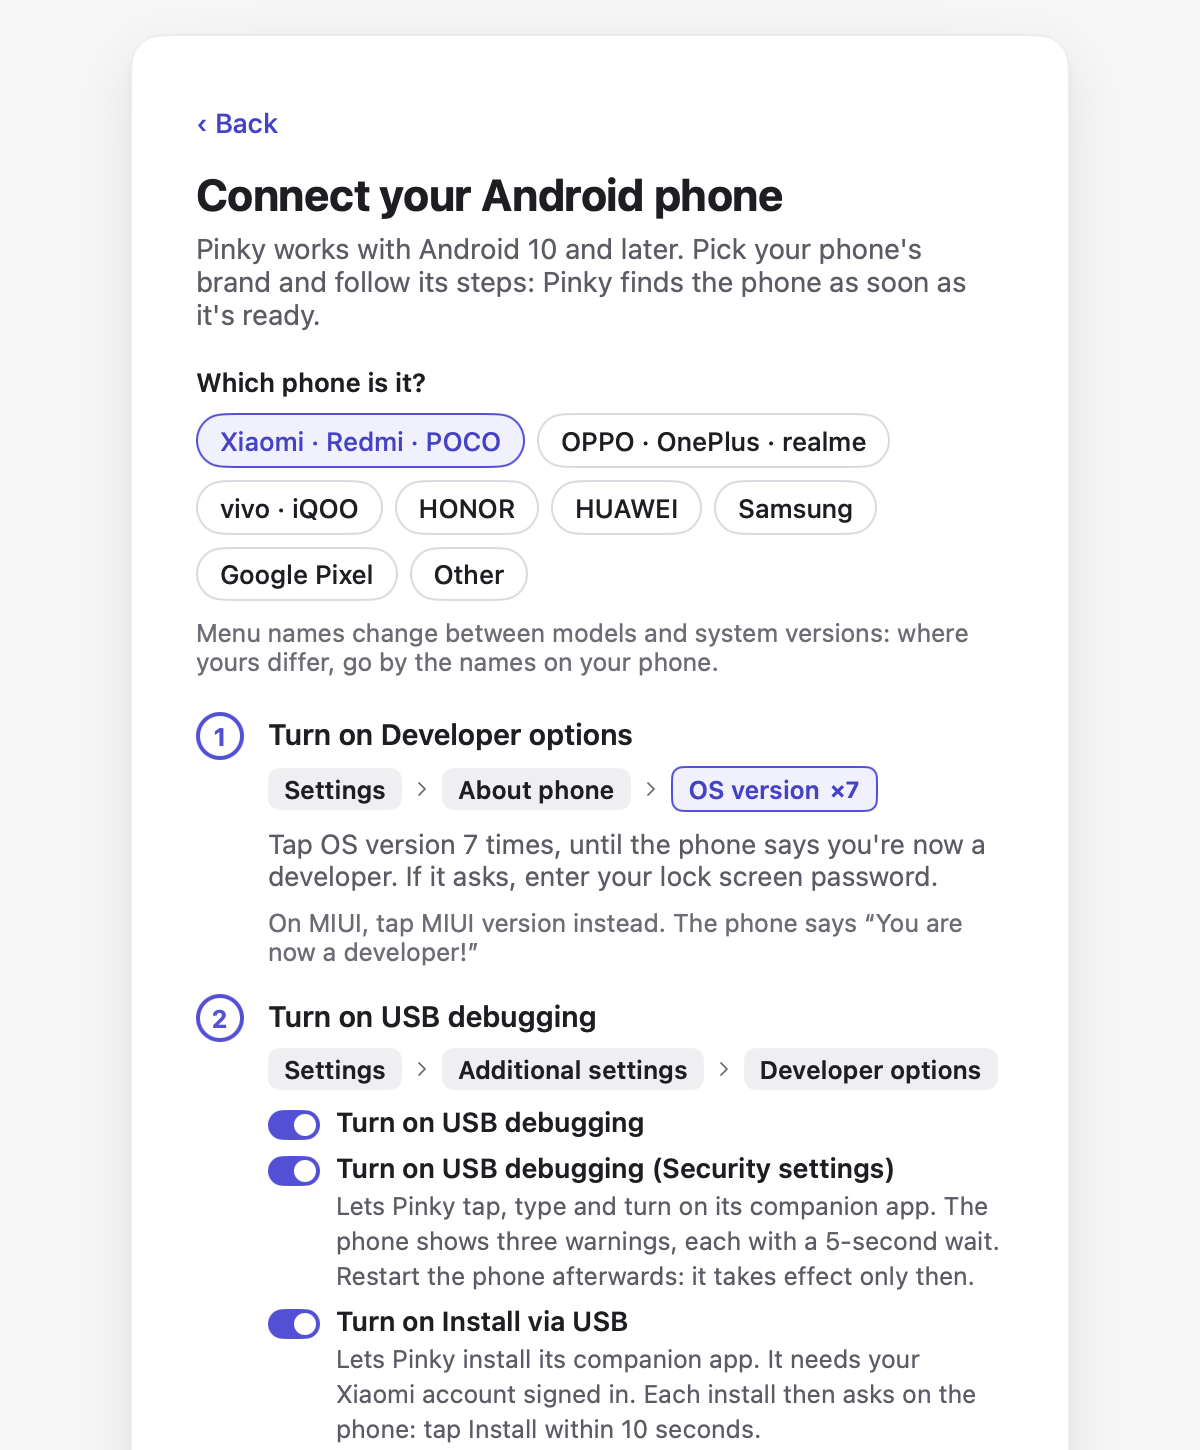 Add phone › Android, with a Xiaomi picked. |
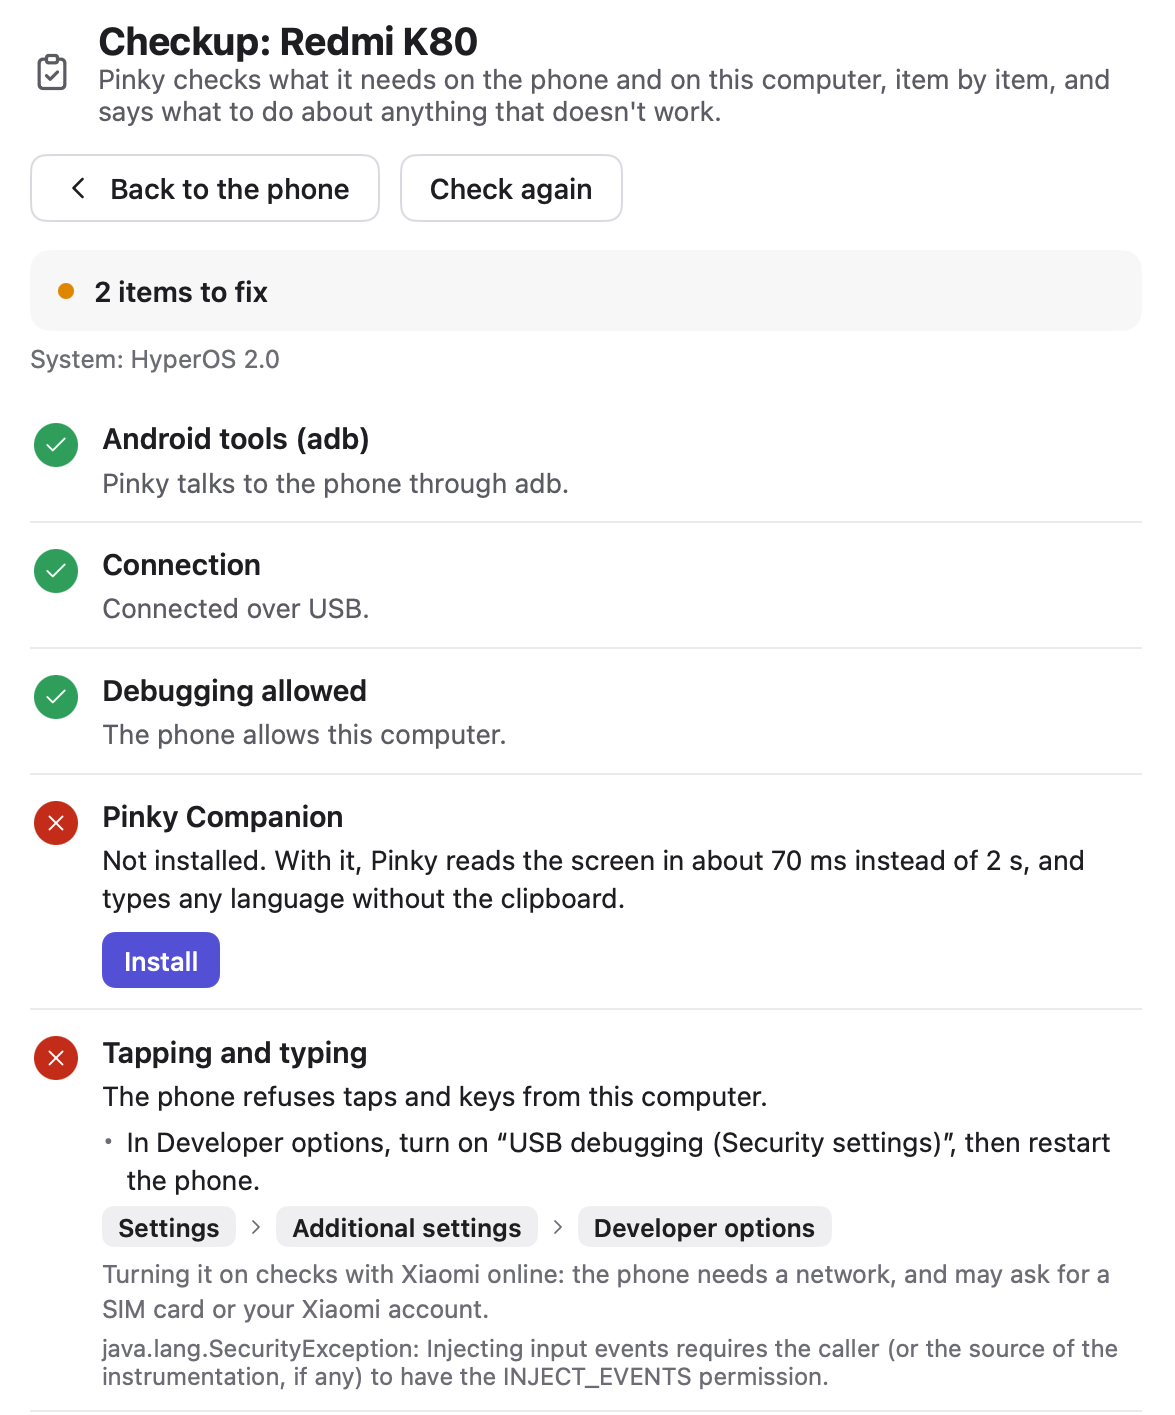 A Redmi's Checkup, with two things to fix. |
Pinky brings its own adb, the tool it reaches Android phones with, built from Android's source, so nothing else needs installing. When the computer has Android's platform tools already, from Android Studio, Homebrew or the system's packages, Pinky uses those, and shares their adb server with Android Studio and other tools.
sudo apt install android-sdk-platform-tools-common on Debian and Ubuntu, android-udev on Arch, android-tools on Fedora. You may also need to be in the plugdev group. Then plug the phone in again. Pinky says so when they are missing.When a phone works on the cable but Pair over Wi-Fi does not finish, the pairing page says within half a minute what Pinky sees:
Pairing over Wi-Fi needs Android 11 or later; an Android 10 phone moves to Wi-Fi from the cable instead (Use Wi-Fi instead…, below). Up to Android 16, Wireless debugging turns itself off when the phone leaves the Wi-Fi network, even for another access point of it, or restarts: turn it on again, or pair again from Add phone.
Pinky prepares an iPhone itself; Add phone › iPhone walks you through it.
1. Plug the iPhone into the computer, unlock it, tap Trust and enter its passcode. On Windows, install Apple Devices from the Microsoft Store (or iTunes) first; on Linux, the usbmuxd package. Add phone says when they are missing.
2. On the iPhone, turn on Developer Mode in Settings › Privacy & Security: Pinky makes the switch appear there. The iPhone restarts; unlock it, tap Turn On and enter the passcode.
3. Pinky mounts Apple's developer disk image on the iPhone and lists it as ready. An iPhone on iOS 27 keeps the image when it restarts; below iOS 27 Pinky mounts it again after each restart, once you unlock the iPhone.
The developer disk image comes with Xcode, Apple's free app for developers, and Pinky does not ship it. On a Mac, install Xcode once and open it: Pinky uses the image it installs, and Xcode never has to run again. An iPhone on iOS 27 or later needs the image of Xcode 27 or later: Apple's signing server no longer signs older ones, and Add phone then says which image Pinky used and how to get a newer one. On Windows and Linux, copy /Library/Developer/DeveloperDiskImages/iOS_DDI from such a Mac into Pinky's folder (where). Without either, or when Apple refuses the image Pinky found (Xcode's, or one copied into Pinky's folder), Add phone offers to download the image from a third-party mirror, github.com/doronz88/DeveloperDiskImage (Xcode 27.0 beta 4, 32 MB, kept by the author of pymobiledevice3, not by Apple), only when you click Download; Pinky checks every file against the checksum it expects, and from then on uses it instead of an image Apple refused. On iOS 27 and later, no app gets installed on the iPhone.
Checked on the iPhone 13 mini (iOS 27.0.1): Pinky mounting Xcode's image itself (in about 1.5 s, after the image had been taken off), keeping the image already on the phone, and that the iPhone keeps the image when it restarts. Not yet tried on a phone: the downloaded image, the Developer Mode switch, iPhones below iOS 27, and pairing an iPhone on Windows. Contributors have used an iPhone and an iPad on iOS 27.2 on Linux (Arch Linux), and an iPhone on iOS 27.2 on Windows 11, on the cable and over Wi-Fi, with the image already on them.
Pinky also uses an iPhone or iPad over Wi-Fi while it is on the same Wi-Fi as the computer, and the computer lists it there, which it does once Wi-Fi connections are on for the phone. Pinky turns them on when you plug the phone in and it trusts the computer: it is the same setting as Finder's Show this iPhone when on Wi-Fi, so a phone already set up that way stays as it is. It is on by default; Settings › Phones › Use iPhones and iPads over Wi-Fi turns it off, which leaves the phones' setting alone. If a phone doesn't show up on Wi-Fi when you unplug it, its Checkup says where it stands under Wi-Fi: whether its Wi-Fi connection is on and whether Pinky turned it on, why Pinky couldn't, and whether this computer sees the phone on Wi-Fi.
On a Mac, the system's device service, usbmuxd, can lose an iPhone on Wi-Fi after its connection broke once (its Wi-Fi turned off and on, say), and not look for it again for up to about an hour; Finder loses it too. Pinky notices when a phone you use is on the network but no longer listed, shows it as Lost on Wi-Fi, and offers Restart device service… on its page: after you confirm, macOS asks for an administrator's password, and every iPhone and iPad, also on a cable, disconnects for a second or two. sudo killall usbmuxd in Terminal does the same. Right after you unplug a phone it says so within about 10 seconds; it waits a minute otherwise, as a phone that wakes comes back by itself. A phone you unplug that this computer doesn't see on Wi-Fi at all shows as Not seen on Wi-Fi, with what may hide it: it's asleep, on another network or one that keeps devices apart (guest networks, some routers), a VPN, or Pinky not allowed on the local network.
On Linux and Windows, the system's device service does not list iPhones and iPads on Wi-Fi by itself: on Linux (the usbmuxd package) it lists them only on the cable, and on Windows (Apple Devices or iTunes) only while they are on the cable too. So there Pinky runs a small device service of its own in front of the system's, while it uses phones over Wi-Fi: it finds the phones paired with this computer on the network and connects to them directly, and passes everything about phones on a cable to the system's. All of Pinky's connections to iPhones and iPads go through it then, on the cable too. There is nothing to install or set up for it beyond the system's own (usbmuxd on Linux, Apple Devices on Windows). If you run a device service that lists phones on Wi-Fi itself, such as netmuxd, and start Pinky with USBMUXD_SOCKET_ADDRESS pointing at it (unix:///path/to/socket or tcp://127.0.0.1:port), Pinky uses that one instead and runs none of its own.
While Pinky opens a phone, or moves it between the cable and Wi-Fi, it shows Connecting or Moving to Wi-Fi rather than offline. Over Wi-Fi Pinky reads text from the live picture rather than from screenshots, which take about 5 s there. An iPhone or iPad without a passcode never reads as locked, so after it has dropped off the network to sleep, Pinky connects to it only once it has been back for 30 seconds.
Below iOS 27, an iPhone takes taps and typing from a computer only through a helper app on the phone: WebDriverAgent, which you build and install once from Xcode with your Apple ID (how). With a free Apple ID it has to be installed again every 7 days: two days before, the phone's page and its checkup remind you, and once it has run out the phone shows as needing setup and says why (how to install it again). It has not been tried on an iPhone below iOS 27 yet. Without it, Pinky can only show and read the screen (on a Mac) and open apps: no taps, swipes or typing. iOS 17.3 and earlier are not supported.
In Pinky, open Settings › Agents and click Connect next to your agent. Pinky finds Claude Code, Claude Desktop, Codex, Cursor, VS Code, Copilot CLI, Windsurf (Devin Desktop) and Gemini CLI on your computer and adds itself to the agent's MCP servers, by the app's own path: with the agent's own command where it has one, such as claude mcp add, or in its settings file, which Pinky copies f
→ →
 →
 →
 →
 →
 →
 →